Pages

Friday, 29 November 2013

It's a Sketch at Polkadoodles


Hi there everyone,

I hope you're all having a good week as we head quickly towards Christmas.

It's Friday challenge time over at Polkadoodles and this week we are having a Sketch Challenge - here's the design we would like you to play with ...


These are a great idea if you are having a 'crafters block' and can be manipulated to suit your design. Here's what I came up with for my DT inspiration ...


I used papers and a sentiment from the 'Angelberry Christmas CD' to make my Christmas design and all other embellishments are from the 'A Home for Christmas CD'. I layered most of the images digitally, then printed out the little house again and decoupaged it and added some glitter for the snow. I finished off with a pretty little organza bow and a few aqua adhesive gems for a bit of sparkle.

Come along and join us with your own interpretations of our sketch this week - there is a great Polkadoodles goodie bag on offer for the winner!

Hugz, Jan xx


Wednesday, 27 November 2013

Midweek Motivation at MMM

Hello again,

I'm back today to show you a little bit more inspiration for our current challenge over at Make My Monday. I hope you are all enjoying our theme this week - if you have entered already, then good luck - but if you haven't there is still plenty of time to join us.

So, here's a different take on my Contemporary Christmas theme ...


I have kept this one nice and simple - it only took about 15 minutes to make. Exactly what we need when we have a huge pile of christmas cards to make.

I hope you can come along and join us and don't forget to pop back to the main blog on Sunday for our next set of winners.

Hugz, Jan xx

Monday, 25 November 2013

Contemporary Christmas

Happy Monday everyone,

Hope you all had a great weekend - mine has been a case of 'out with the old' and 'in with the new'! My poor old pc has finally given up the ghost and has been laid to rest in the pooter graveyard. I now have a snazzy new laptop all up and running which my gorgeous hubby had bought be for Christmas - and yes, he let me have it early. I feel suitably spoiled!

So, as it's Monday it's time for our next challenge over at Make My Monday and this week was my turn to choose a theme. As Christmas is approaching fast, we are staying on a 'christmassy' theme and this week we would love to see your projects showcasing

'A CONTEMPORARY CHRISTMAS'

So, out with the traditional red, gold and green and in with something different. Here's what I made for my DT inspiration ...


I decided to go for lilac and silver for my contemporary colours and I used a stamped image by LOTV called 'Teddy and Penguin', which I coloured with my Promarkers.  I also added a Christmas sentiment, together with some ribbon and a few die-cut snowflakes.

Please pop over to the main blog if you have a minute and check out the work of my teamies. I shall look forward to visiting your blogs throughout the week to see what you do with the new theme.

Hugz, Jan xx

Friday, 22 November 2013

U for Umbrella

Good morning everyone,

Exciting times ahead - the DT call for my new challenge blog has now closed and I will be announcing my new design team members very soon (should they choose to accept!) Lol.

Now on to today's post - it's time for the next letter over at the Alphabet Challenge and this week it was my turn to choose the theme. So the letter is 'U' and the new theme is
'USE AN UMBRELLA' 
very appropriate for all this wet weather don't you think! Here's what I made for my DT inspiration ...


It's a quick and simple one this time - a little 'Forest Moss' distress ink, my cute little umbrella stamp and one of my favourite quotes, which was printed on my pc (which is now on it's last legs!!) I really hope Santa has listened to my pleas!

I hope you have fun with the theme this time and I shall look forward to seeing your entries over on the challenge blog.

Hugz, Jan xx

Monday, 18 November 2013

The Big Guy Santa

Hi there,

I'm back again with my second post today with the next challenge over at Make My Monday.  This week Fliss has chosen the theme of

'THE BIG GUY' 

Now this one posed me quite a problem - would you believe that amongst all my stash of stamps, I didn't have one of Santa - how rude! So, I have had to use a printed image which I made into a topper to create my simple christmas card. Here's what I ended up with ...


I simply added some christmas paper and a piece of christmas ribbon, together with three red dew drops to finish off. A nice quick and simple card.

Hugz, Jan xx

Spots and Stripes

Happy Monday,

I hope everyone had a great weekend, despite the falling temperatures.

It's time for our next challenge over at My Besties UK and this time we would love to see your projects using
 
'SPOTS AND STRIPES'.

Here's what I made for my DT inspiration ...


I used spotty paper and stripey paper from my 'Sweet Owl' First Edition paper pad. I added a piece of pink polkadot organza ribbon, together with my main image which is mounted on a Decorative Labels Eight nestie cut from co-ordinating cardstock. The image (no 061) is by Sherri Baldy and is coloured with my Promarkers. The stamped sentiment is by LOTV.

Click HERE for more inspiration from the design team over at the challenge blog.

Hugz, Jan xx

Friday, 15 November 2013

In Shape for Christmas

Hello there,

Well, it's been a very tough week here with a bit of a health scare for me, but I'm glad to say that everything is all ok now. It's my youngest daughter's graduation today, so a good day all round for us - she is so excited having waited since July for this day.

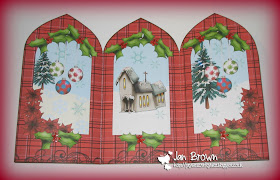
Anyway, back to the crafting and it's time for another challenge over at Polkadoodles and this week our theme is to make

'A SHAPED CARD - WITH NO DIE CUTS'.

So here's what I made for my DT inspiration ...


Everything you need to make this card can be found on the fabulous 'A Home for Christmas CD'. Simply print out all the elements, cut them out and stick away - how easy is that! It doesn't really show very well on my photo, but lots of the holly and poinsettia elements are cut out and decoupaged too, together with the quirky little church in the centre. I added a little bit of stamping along the bottom and some glitter on the snow to finish - not a single die-cut in sight!

Hugz, Jan xx

Monday, 11 November 2013

Christmas at MMM

Good morning,

Well, that's another weekend over and another week closer to Christmas and I haven't even started my shopping yet.

As it's Monday, it's time for our next challenge over at Make My Monday and this week Laura has chosen the theme of

'ANYTHING BUT A CARD - CHRISTMAS THEMED'

So, we would love to see your Christmas themed projects this week - but remember it has to be something other than a card. Here's what I made for my DT inspiration ...


I love making Tags so this was an obvious choice for me. I used some 'freebie' stash that came with the 'Simply Cards & Papercrafts' magazine that I bought this week - I must say it's a great freebie if you haven't seen it yet!  The papers and 'Merry Christmas' sentiment are Kaisercraft and you even get a packet of the little tags too. So all I did was did my own tag template out and get sticking, plus a few embellishments of course!

I shall look forward to seeing your entries this week over at the challenge blog.

Good luck, Jan xx

Sunday, 10 November 2013

New Design Team Member at Fantasy Stampers

Hello crafty friends and followers,

I have more exciting news today regarding my new challenge blog - Fantasy Stampers, but first just wanted to say a massive 'Thank You' to all of you that are supporting my new venture and are helping to promote it on your blogs - I am one very grateful gal!

So, today the new blog is introducing the very first member of our Design Team - a great crafty friend of mine, which some of you may already know and have seen around blogland. Here's a little peek ...


If you would like to read more about Caz, pop over to the new blog HERE.

And don't forget our DT call is still open and if you would like to join us full details can be found HERE.

Hugz, Jan xx

Thursday, 7 November 2013

Brand New Challenge Blog

Good morning crafty friends and followers,

I hope you like my new look blog - I decided it was time for a makeover to celebrate my exciting news.

After much thought and deliberation I am taking the next step in my crafty journey and have decided to start my own Challenge blog.  I have been polishing the final details all week (that will teach me to have a week off work) and the blog went live yesterday.

It is called the 

'FANTASY STAMPERS CHALLENGE BLOG'

and will host a paper crafting challenge for ANY kind of stamping
on alternate Saturdays beginning on 4th January 2014.


I am now looking for a Design Team to be a part of this venture and you can find all the details on the new blog HERE.

I would love it if you could pop along and leave a comment at http://fantasystampers.blospot.co.uk and maybe share the details and spread the word with your own crafty friends.

I would also like to say a huge thanx to you all for your support of my work - without you I don't think I would have made this next step. I hope you will all come along and play and if anyone is interested in joining my design team, I would love to hear from you.

Big hugz, Jan xx


Monday, 4 November 2013

Autumn Flowers

Good morning,

I hope you all had a great weekend, despite the awful weather and all the bangs and fizzes from the fireworks - and it's not even Bonfire Night yet!!

It's time for our next challenge over at Make My Monday and this week Fliss has chosen a lovely seasonal theme of

'AUTUMN FLOWERS'.

So here's what I made for my DT inspiration ...


I think you can tell that I have been watching Clarity Stamps on the tele all weekend - this one seems to be heavily influenced by Barbara Gray's style, although sadly they aren't Clarity stamps.

I began by dusting the edge of the card with Scattered Straw distress ink to create an airbrushed look, then used one of my Stampin Up 'Serene Silhouettes' stamps to create the images in different shades of distress inks. I used Scattered Straw, Rusty Hinge, Peeled Paint and Gathered Twigs - then added a final layer and embossed them with gold detail powder. I stamped the little quote with black archival ink and added the birds. A piece of twine and little button finishes off the card, which is layered on brown and gold card.

I hope you like my version of 'Autumn Flowers' - I shall look forward to seeing your interpretations on the challenge blog.

Just before I go, and incase you didn't see my earlier post - please pop along and take a peek at my new challenge blog http://fantasystampers.blogspot.co.uk/ which is due to launch on 4th January 2014.  I am looking for DT members to join my new venture and details of the DT call can be found HERE.

Hugz, Jan xx

Sunday, 3 November 2013

Lottie Lionheart

Happy Sunday,

Well, my half term break is nearly over and I must return to school tomorrow, so not as much time for crafting.

It's time to post over at Sherri Baldy Art and I have my fourth instalment of 'My Besties of Oz' project to show you today.  Last week I showed you 'Tilda Tin Girl' and this time I have used image 645 - 'Lottie Lionheart', which you can buy from Sherri's on-line store HERE.


I think this one is my favourite and I love the autumn colours - the image is coloured with my Promarkers and all embellishments are from my stash.

Hope you can join me next week for the final instalment.

Hugz, Jan xx

Friday, 1 November 2013

Make a Box for Christmas

Hello to all my crafty friends and followers,

It's time for our next challenge over at Polkadoodles and this week we are 'MAKING BOXES'. It was my choice of theme this time and I love making projects that aren't always cards.  My DT inspiration this week uses the 'A Home for Christmas CD', together with a template from the 'Paper Boutique - Volume 1 CD' and includes a tutorial on how to make my gift box, so here goes ...

Step One
Print out your chosen paper twice 
and then put the two sheets back into the printer 
and print the templates onto the reverse.


Step Two
Cut out the box outlines, then score along the dotted lines 
using the template as a guide.


Step Three
Fold along all the score lines and burnish with a bone folder.
Ink all the edges with your chosen ink (optional).


Step Four
Cut a piece of white scrap card to make a 8.7cm square 
(these measurements are for the A4 template).
Stick this to the inside of one of the box sides to reinforce it
before cutting out an aperture using a Circle die.


Step Five
Using a matching Scalloped Circle die and the next size down Circle die,
cut a frame from co-ordinating cardstock.
Cut a piece of acetate to fit the back of the aperture 
and stick down on the inside.
Stick the die-cut frame to the front of the aperture.


Step Six
Stick the flaps together on both sides to make the box whole.
(I use wet glue for this as it allows time to get the edges lined up).


Step Seven
Glue the flaps together to close the bottom of the box.
(Use a long handled paint brush to reach inside and flatten the flaps).
Add another 8.7cm square of scrap cardstock inside 
to reinforce the bottom of the box.

Fold the top sections together, 
pushing gently on the diagonal score lines 
to create the 'milk carton' effect top.

Measure even spaces and punch two holes in the top of the carton. 
Thread ribbon through the holes and tie to fasten.

Now your box is ready to decorate and fill!


Here's my finished sample with added embellishments from the CD,
all ready to fill with goodies for Christmas.


I hope you enjoyed my tutorial and found it easy to follow - I would love any feedback that you may have.

I shall look forward to seeing your projects over at the challenge blog.
Hugz, Jan xx