Thank you for taking the time to visit - I hope my designs provide a little inspiration.
Please pop back soon and if you would like to follow me just click the little blue box below xx

Followers

Follow this blog with bloglovin

Follow on Bloglovin
Showing posts with label hearts. Show all posts

Tuesday, 7 February 2017

Love You!

Hello,

Well, I had my first Sunday off since starting my new job (apart from the Christmas holiday ones) and what did I do - craft of course! I have two family birthdays coming up this week so needed to get busy - my hubby and my sister both celebrate their birthdays within two days of each other, so a busy week. I will show you their cards at a later date though.

I have my next DT project for the new challenge at Cardz 4 Guyz today and Caz has chosen a very appropriate theme for the time of year. Here's what I made for our new challenge

'LOVE YOU!'


I'm really pleased with how this one turned out. A little bit of stamping and some die-cutting made this an easy one to put together. I love the cute little wooden heart just to finish off.

The text is actually a scrap of design paper, the background stamping is from my 'Gorgeous Grunge' set by Stampin' Up (a real go-to stamp set - I love it!) The hearts are cut using Leonie Pujol's mixed media dies and I cut them from several scraps of design paper and cardstock.

Hope to see you at the challenge,
Hugz, Jan xx

Friday, 6 January 2017

V for Violet

Hello again,

Two days in a row! I have my next DT project today for the new theme at the Alphabet Challenge and this time Amy has chosen 'VIOLET' for the letter 'V'. So, here's what I made ...


This one is actually for a friend's 40th birthday later in the month (look at me getting organised!) but she doesn't use Blogger so won't see it here.

It's a 6" x 6" cream scalloped card blank covered with papers from my stash which have been distressed and inked around the edges.

The larger purple heart is cut with my Stampin' Up Bloomin' Heart die and then I have layered a second one which is cut from cream cardstock and has a little lilac one on top.

Embellishment include a piece of vintage lace, a stamped LOTV sentiment, some die-cut flowers and a piece of tied twine, along with some adhesive pearls/gems. Hope she likes it.

Hugz, Jan xx

Friday, 5 August 2016

Love Heart Bag

Good Morning,

I hope everyone has had a good week - mine has been a very busy one this week (well, the last couple of days anyway). I am hoping to get back into my craftroom later today :)

We have a brand new theme over at the Alphabet Challenge today, and this time it was my turn to choose, so for the letter 'L' I chose

'L for LOVE'

This is such a generic theme and can be incorporated into so many occasions, so here's what I made for a little inspiration ...


I decided to have a change from cards this time, and decorated this little kraft coloured paper bag.

I used up some scraps of design paper from my stash and added some faux stamped stitching around the edge. The next layer is the gorgeous die cut 'Bloomin' Heart'  from Stampin' Up, which is cut from some rose coloured cardstock. I added a smaller heart next, which is raised on some dimensional pads, then the little stamped sentiment. 

Embellishments include a piece of pink polka dot ribbon, a length of string pearls, a couple of die-cut flowers (also from the 'Bloomin' Heart' set) and some adhesive pearls.

Hope you can join us with your own 'Love'ly' creations.
Hugz, Jan xx

Friday, 4 March 2016

A for Anything Pink!

Good morning,

Well, it's Friday again - it sure does come round quick! It's been a very busy week with lots of things happening once again, including my daughter crashing her car yesterday! She is fine, but sadly I don't think her car will survive - it's currently with the insurance company and my OH seems to think they will write it off, so once we have the ok from them, it's off car hunting we will go.

On a crafty note, it's time for us to begin our alphabet once again over at the Alphabet Challenge, and this time it was my turn to choose the theme. So, for the next two weeks we would love to see your projects that are

'A for ANYTHING PINK!'

This has to be once of my favourite colours when crafting, and I think I went a little overboard with my mixed media project - here's what I came up with for my DT inspiration ...


First, I had a rummage through my stash and chose lots of bits and pieces to play with.

I began with a piece of thick cardstock which measures 18cm x 18cm, then covered it with my chosen pink design paper from my 'Heartfelt' LOTV paper pad. I inked around all four edges with Spun Sugar distress ink.

Next, I added some texture paste through a piece of sequin waste, then once dry dusted over with the same pink distress ink so it toned in with the background paper.

I dyed a length of white lace with the same ink - just squidging the ink on my craft mat and spritzing it with water, then using the lace to soak it all up. This was attached to the background piece before I added the heart, which is also covered with a different piece of design paper from the same paper pad - I love the crackled effect on this one.

Then I went to town with all the different embellishments I found, including lots of die-cut flowers, some pink buttons, a few little book paper circles (which I punched and coloured with a Promarker), a cute little wooden frame (which I painted with pink chalk paint and added a sentiment inside), the wooden lettering 'love' (which was painted then glittered), a couple of die-cut butterflies and lots of adhesive pearls and crystals.

The whole thing is mounted on a layer of white, then another piece of pink cardstock and voila! Definitely lots of Pink!! When I asked my OH if he liked it - he said, 'I suppose it's ok if you like pink!' I think that was a result. Lol.

I hope you love 'Pink' as much as I do and can find time to come and play along with us at the challenge this time.

Hugz, Jan xx


Saturday, 30 August 2014

Hearts and Flowers at Fantasy Stampers

Good morning,

Well, this is my last weekend before I return to school on Monday - where did that six weeks go?!

It's time for our next theme over at my own challenge blog 'FANTASY STAMPERS', so for the next two weeks we would love to see your projects using

'HEARTS AND FLOWERS'.

Here's what I made for my DT inspiration ...


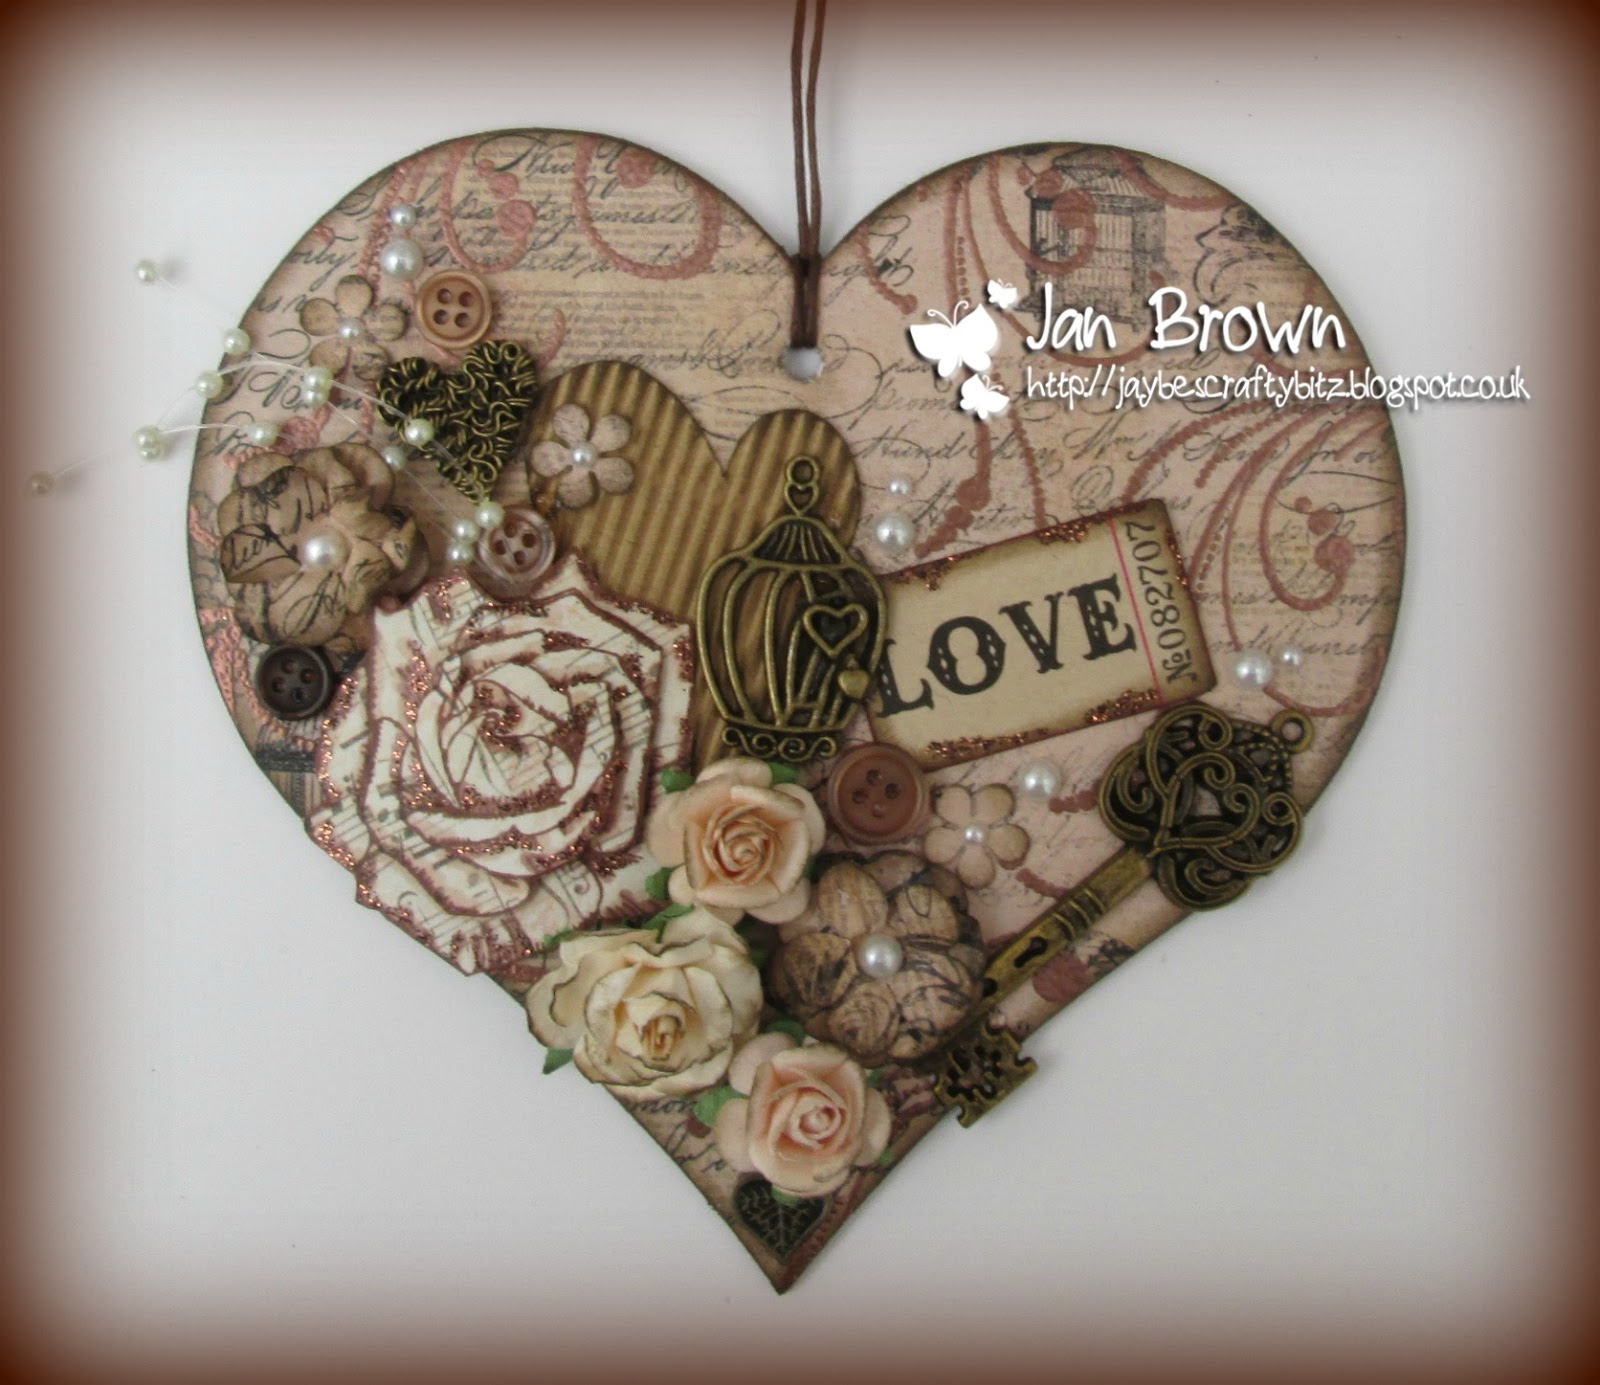
I decided to use one my many chipboard hearts for this one and covered it with a design paper from my stash. I inked the edge with Walnut Stain distress ink then stamped a flourish all the way around the edge using my Versamark inkpad, before embossing with copper detail embossing powder.

I covered the heart with loads of embellishments, including the stamped rose - this has to be one of my favourite flower stamps (it came free with one of my Craft Stamper magazines) and it's also great for layering up. I added a little copper glitter to highlight the shaded areas of the stamp too. Other embellies include some paper roses, a couple of handmade flowers from the leftover backing paper, a corrugated kraft card heart, a metal birdcage, metal heart and gorgeous metal key, a Tim Holtz 'Love' ticket, together with some buttons and a few adhesive pearls.

I hope you can pop over to the challenge blog and check out what my team made and we would love to see you play along too.

Have a great weekend,
Hugz, Jan xx


Tuesday, 11 February 2014

Truly, Madly, Deeply!

Hello again,

I'm back today with news of our next challenge over at Cardz 4 Guys and not only is the title track of one of my favourite songs, it's also the theme that Caz chose for the next week

'TRULY, MADLY, DEEPLY'

Here's what I made for my DT inspiration ...


With Valentine's Day only three days away, I decided to make a male themed Valentine card - so, out with the pink and in with the black and red. This was a really quick one to do and I managed to use up some more of my stash scraps (another tick for my NY resolution)! Lol.

Ingredients include: 6x6" card blank, one piece of leftover design paper, small strip of red pearlised card, a scrap of black ribbon, a small piece of both black/white card and three self adhesive gems. The wording was printed on my pc. Simples!

Why not pop over to the main blog and check out the design team projects.
Hugz, Jan xx


Saturday, 14 September 2013

Follow Your Heart

Hello and good morning from a very wet Yorkshire,

I'm back today with a little make using some more of the gorgeous Studio 12 stamps from Polkadoodles. I adore the little 'heart' which can be found on the 'Distressed Zig Zag' set which you can buy in our on-line store HERE.

Here's what I made ...


The artwork measures 8.5 cm square and is framed with a 6x6" mount, but you could just as easily recreate this on a mini canvas. 

I began with a piece of white cardstock which I covered with distress inks in Mustard Seed and Peacock Feathers. Then I used a variety of little stamps from the same set to over stamp using the same inks to create a background (the text stamp is from my own stash).  I stamped the hearts directly onto the card and then stamped again on a scrap of book paper, cut them out and coloured them with the same distress inks before embossing the front one with clear powder. The sentiment is printed on my pc and I added a little doodled line around the edge.

Don't forget our new challenge went live yesterday - so if you haven't seen it yet just click HERE.

Have a great weekend,
Hugz, Jan xx

Sunday, 17 March 2013

Inky Fingers at Studio 12


Morning everyone,

It's my turn to post a little inspiration over on the Studio 12 blog today - here's what I made ...


This gorgeous heart image is one of the cutting files in the 'Welcome Home' section of the Picknix 1 CD. But as I don't have a cutting machine, I like to use them as .png images to print. I love the solid black outlines, which are great for printing onto an inky background, which I made using one of my favourite distress ink colours - Victorian Velvet, with a little added spritz of pearl shimmer mist.

Once finished, I popped the inked piece through my printer and added the heart image and the sentiment, which is also from the CD. I printed a second copy of the hearts and cut out some of the centres to make a mask, before stamping inside a couple with a small flower stamp. I coloured a couple of the other hearts with an extra layer of distress ink and then outlined the whole thing with a Promarker to give some shadow.

Hope you like it - have a great day.
Hugz, Jan xx


Friday, 8 February 2013

Valentine

Hello there,

It's Friday again, which means it's time for another great challenge over at the Polkadoodles Challenge blog.  This week our theme is 'Valentine Love' and we would love to see your Valentine projects.  I decided to go all contemporary for this one - here's my DT inspiration ...


I used smooth white cardstock to make an A5 sized card.  I layered a slightly smaller piece of white card onto a mat of lilac pearlised cardstock.  The 'Valentine' lettering was printed on my pc before I put the card together.  The hearts and the paper used for the die-cut border are both from the new 'Cherryblossom Lane' CD and a piece of ribbon from my stash to finish off.  A really quick 'clean and simple' card.

Don't forget to pop over to the blog to check out some more fab inspiration from my teamies and if you would like a copy of the 'Cherryblossom CD' (or any other Polkadoodles CDs) - they are all on offer at £9.99 at the Polkadoodles shop HERE.

Hugz, Jan xx

Saturday, 19 January 2013

Hanging Hearts

Helloo from a very snowy Yorkshire,

We are thick in snow this morning - it snowed all afternoon and all evening yesterday and we have lots of it! My little doggies love it - Lacey keeps sitting by the back door wanting to go and play; she thinks she is a snow plough - she comes back in with a cute little pile of snow on her nose where she has been sniffing! Lol.

I have been working on some DT projects, but can't show you them just yet (one coming up tomorrow) - so I thought I would post a little project I made for my daughter's bedroom (which as you may have guessed, is decorated in purple!)  Here's what I made ...


I made the wall hanging using two chipboard hearts which I bought at a craft fair last summer.  I covered them with lush purple paper from the Tim Holtz Vintage paper stack and inked around the edges with distress ink.  I then went to town with the embellishments and added a bit of whatever I could find - there is a complete mixture of some stamped elements, some die-cut elements, some Frantage embossing powder, a gorgeous Tim Holtz key and a few other bits and bobs from my stash.  I was really pleased with the outcome, and so was my daughter!  Here's a couple of close-ups ...


I would like to enter this into the 'Stampin' for the Weekend' challenge which is 'Something Girly' - think this works, well it was made for my 'girly'. 

Stay safe if you have to go out in the snow, or why not stay in and craft like me ;)  Hugz, Jan xx

Sunday, 26 August 2012

It's all about the Texture

Hi there,

I hope everyone is enjoying their weekend - we have had quite a bit of rain here.  I have been playing a continuous game of washing out/washing in all weekend! In between my crafting, of course! Lol.

I have gone all 'Steampunk' today making a special card for a design team call.  The theme is 'Texture' and I have tried to show this in several ways.  Here's what I made ...


The background paper is from the TH 'Lost and Found' paper stack and I distressed the edges with my scissors, before inking them with Walnut Stain distress ink.  I then inked through the clock mask and heat embossed some little cogs and gears down the right hand side with gold detail embossing powder.  I stamped some wings, gears and paint splodges onto the background paper and added some little torn pieces of text from an old book.

The main image is a Kanban stamp - partly coloured with Promarkers and the jacket is paper pieced. The image is backed with brown coredinations cardstock cut using a Spellbinders Labels Seventeen die.  It has been dry embossed with an embossing folder and then sanded back to show the core.

The 'Steampunk' lettering was mainly created on my pc, apart from the letter 'S' which was cut from a piece of card covered in metal tape, embossed and coloured with alcohol inks.  The flower was made in the same way.

Additional embellishments include a heart cut from corrugated card and inked with distress ink together with an additional brass-coloured wirework heart, a little brass clockface (which I added some chain to), some metal washers and a 'Dare to Create' sentiment.  I also treat some parts of the card to a sprinkling of gold Frantage embossing powder.

I think I managed to get some texture in there - hope I didn't overdo it! Lol.  I am off to submit it now and should find out at the beginning of September if I have been successful.  I hope so - wish me luck.

Hugz, Jan xx